Thursday, June 28, 2012

Recipe Week 4: Pasta Carbonara


I'm still playing catch up a bit. I made this recipe a couple weeks ago. It was a pretty easy weeknight dinner, and reminded me a bit of homemade mac n' cheese.


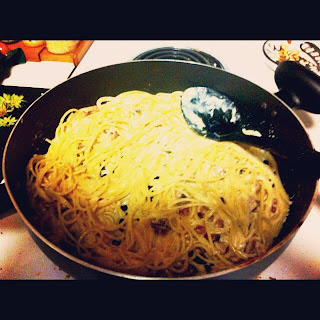
It is pretty simple to make. You start with fresh pasta.


Then, cook some diced pancetta in a pan with oil and add it to the pasta.

The cheese sauce is made from a rich, heavy cream, freshly grated Parmesan cheese, and egg, all whisked together.


Finally, the sauce is added to the pan and cooked on low heat, otherwise the egg will scramble.


All in all, this is a very easy weeknight meal. I got about 4 servings worth out of the batch.

Recipe is found here on Spoon Fork Bacon's website. While you're there, poke around a bit, they have a nice selection of both savory and sweet dishes, and many of them are Asian recipes you can make at home.

Sunday, June 24, 2012

Recipe Week 3: Cookie Dough!


So, while I have been good about trying new recipes, I'm still getting into the swing of blogging about them every week. Brace yourselves for a bit of backlog.

I had preordered this book when it came out and, as the name suggests, it is chock full of decadent cookie goodness.

So, to branch out from Joy the Baker for a bit, I tried the most basic recipe in this book: cookie dough.

This cookie dough is a little different than what I'm used to. The is no egg, no baking powder or soda. It is not meant for baking, it is meant for eating. Which is pretty much the most amazing thing ever.

It is a pretty simple formula that anyone who bakes cookies would be familiar with: cream butter, add sugar, add dry goods, add chocolate chips. The recipe normally yields about 1 1/2 cups. Not wanting to eat all that myself, I cut the recipe in half ( and still ended up with 1 cup of it. I think my division skills have deteriorated ).


I split it up into 2 containers, ate one and put the other in the freezer. I've found it tastes better out of the freezer -- it has more of the consistency of cookie dough you buy in a tube. Also, although the recipe says you can eat it immediately, you really should chill it a bit first, it tasted a bit off to me until it had some time in the fridge.


Below are my alterations to the recipe -- enjoy!

Eggless Chocolate Chip Cookie Dough
(adapted from The Cookie Dough Lover's Cookbook, by Lindsay Landis,  pg 12 )

Makes about 1 cup

1/4 cup butter
1/8 cup granulated sugar
1/4 cup packed light brown sugar
1 tbsp milk
1/4 tsp vanilla extract
1/2 cup + 1/8th cup all purpose flour
1/8 tsp salt
1/4 cup mini chocolate chips ( or add more, like I did. Chocolate chips aren't meant to be measured )

1) Cream butter in an electric mixer.
2) Add sugars to the butter and mix for a couple minutes until fluffy.
3) Add in milk and vanilla and mix until incorporated.
4) Mix flour with salt, and then slowly add this to the batter with the mixer running, tapping it in until it is all incorporated.
5) Stir in chocolate chips by hand. Transfer to a container and chill for about half an hour before eating ( or you can eat it immediately, but it might taste a bit funky ).

Dough will last 3 days in the fridge. I had it in the freezer for about a week with no ill effects.

Thursday, June 7, 2012

Recipe Week 2: Lemon, Lime & Thyme Cookies


For my next recipe, I tried another Joy the Baker recipe ( I'll branch out to another author next week, I swear! ). This one is from her cookbook on page 190.


The recipe is basically a shortbread recipe with a little bit of fanciness added. The first unique bit is that the sugar is changed to citrus sugar by rubbing in lemon and lime zest.


Next you cream the butter in an electric mixer.


Then, add in the sugar and some thyme.


Once the rest of the dough is mixed together, roll the dough in wax paper. The recipe says to chill at least 3 hours to overnight. I made mine a couple days ahead of time.

Once you're ready to bake them, you just roll out the dough and cut out the cookies. Simple!


These cookies are slightly sweet and go great with a big glass of milk. They were definitely a hit with my family :)

Project #4: iPad Case


After I made my new purse, I wanted a new case for my iPad as well. I followed this pattern for the slipcase, but I added about 4 inches to the length of the main body so that the top would fold over more.


I also doubled the width of the pocket and folded it over so that it was lined. Before I folded it in half and sewed it, however, I added a piece of velcro to the pocket so that the stitching would be hidden. I stitched the opposite side of the velcro to the exterior fabric before stitching it to the lining fabric.


Other than that, I followed the tutorial pretty much exactly.


I made it a little too wide, so the iPad shifts around a little in the case, but for a first attempt I think it came out pretty well :)

Tuesday, May 29, 2012

Recipe Week 1: French Onion Soup Sandwich


Joy the Baker is a genius. If you haven't visited her site before, I highly suggest clicking this link here and checking it out. Her writing is so bright and cheerful ( and honestly a little manic sometimes, but I find that charming ) and her recipes range from healthy smoothies full of kale to delicious cakes that I can only describe as pure decadence.

But when I saw the words "French Onion Soup Sandwich", I just HAD to try it, and I think it was a lovely way to start this little project of mine.

This recipe is pretty simple, just time consuming. Once the onions are caramelized, it only takes a couple of minutes to put together the sandwiches. But it's an agonizingly long amount of time to turn this:

into this:


For me, it took about 45 minutes, during which my apartment smelled incredible and I had to use every ounce of willpower I had not to just give in and eat something before I could have my sandwich for lunch. Joy says to check the onions every 4 minutes once you start caramelizing them, and I would highly recommend just setting a timer on your phone and doing this religiously, because every time I checked on them they were getting close to being glued to the bottom of my dutch oven, and if I had lollygagged getting to the oven I would have been disappointed by a burned batch of onions.

Once they looked brown, I added in cooking sherry and stirred until everything loosened from the pan. Then it was just a matter of grating the Gruyere cheese, assembling the sandwich, and grilling it on my cast iron griddle:


The recipe can be found here. The only change I made to the process was I used sweet vidalia onions instead of white onions, because I prefer their flavor and, honestly, they make me cry less when I go to slice them up :) 

Project #3: A New Purse!


So, almost a month ago now, I bought a new iPad. Unfortunately, the purse I had been using religiously for over a year is entirely too small for an iPad. So, there was only one thing for me to do :)

I purchased a limited edition kit from Charlie's Aunt. However, you can buy the pattern here and you can also buy some of the fabric at her site here.

All I needed to purchase was a yard of lining fabric and the interfacing. Here are the materials all laid out:

And then after I had cut out all of my pieces:

I didn't take too many pictures of the construction process. The pattern is exceptionally well diagrammed, so as long as you follow along well it is pretty simple to put together. The only adjustment I made was that I sewed the buttons to the flap before I stitched closed the side so that the stitching is hidden. Sewing buttons is still one of the things I'm messier at, so hiding my hand stitches is always preferred.

Here is the finished product, with plenty of room inside for my iPad. Also, you can see the coin purse I made before. It's been handy for keeping the purse organized.

Wednesday, May 16, 2012

A Recipe A Week

I love to cook. I blame my grandmother, she had me helping her bake by the time I was 6 so now the kitchen always feels like a place where I should be making something. I confess that I eat mostly frozen dinners lately, and it makes me a little guilty because I know I would be happier and healthier if I cooked more.

Unfortunately, it's only me in the apartment at the moment so I've been unmotivated to make anything for myself. I generally use food as a way of expressing affection ( and, let's be real here, to impress people with my mad skills, I'm not entirely without pride ), so I tend not to cook when it's just me. However, that doesn't stop me from buying cookbooks by the bundle and adding new recipes to my pinboard at a daily increasing rate.

So, because I love making more work for myself, I'm going to set myself another goal. In addition to making 27 Things, I will try a new recipe every week, and then post about it here. I promise to make at least one, but I know I will probably have a few weeks where I have a lot of energy and I'll make a bunch of stuff :)

Tuesday, May 15, 2012

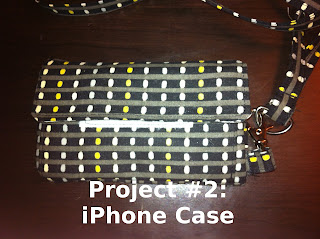
Project #2: iPhone Case


The same day I worked on Project #1, I also completed this iPhone case. I actually did all of my cutting for both projects at once, and then sewed them one after the other. This worked relatively well too, since the Key Purse was a bit more intricate to put together, this was a nice relaxing project to finish with.

I purchased the pattern from Heart of Mary's Etsy shop. The pattern has a lot of pictures to follow along with so I didn't take any of my own of the construction process.

Here is another view of the finished product, showing the front with the button closure:

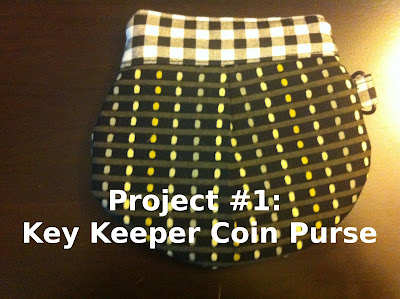
Project #1: Key Keeper Coin Purse


This weekend I started my quest to complete 27 crafty projects. I started with this Key Keeper Coin Purse. It's a small zippered case, large enough to fit your fist inside, so it's perfect for carrying little things, like keys and spare change.

The pattern for this case can be found in the book Amy Butler's Style Stitches: 12 Easy Ways to 26 Wonderful Bags. It is project 7 in the book, and the pattern for the main body and the lining is printed on some nice pattern paper in the pattern envelope included with the book. The directions are relatively simple, however there aren't any photos of the process and minimal diagrams, so I took a few pictures of the process as I put it together.

Here are the pieces all cut out:

And here are some photos of the pleating process ( Step 4 );


Eventually you will have both the interior and the exterior pleated and fabric bands added to the tops ( Steps 5-7 ):


Then a pocket will be added to one of the lining pieces ( Step 8 ):


Next the zipper is installed between the exterior fabric and the lining ( Step 9 ):


Finally the tab is attached and the sides of the purse sewn together ( Steps 10 - 12 ).


I pretty much followed the instructions exactly, except I added a D ring to the tab, since the D rings I had have to be sewn in rather than slipped on later.

I hope these images are helpful if anyone else tries to make this pattern :)

Tuesday, May 8, 2012

27 Projects

Yesterday I realized I have a problem. I have so many ideas of things I want to sew and craft that I get option paralysis, so I have a closet full of fabric and yarn and barely anything to show for it.

However, I am very good at doing things if I have a clear, distinct goal for myself.

So, in honor of my 27th year, which will be starting after my birthday in a couple of months, I am going to do 27 crafting projects, mostly sewing but I may throw a little bit of knitting in there as well. Some will be gifts, some will be for me, but there will be 27 of them and I will have them finished by my 28th birthday.

Now, I'm not much of a photographer, but I will make an effort to record my progress as best as I can and share it here. Maybe in the process my photography skills will improve as well.